Jinya CMS Version 26.0.0 released 🥳
After a year, yes, a year, of development, the new version of Jinya CMS is available. Yesterday version 26 was released. This release includes a lot of stuff and caused several projects to be rewritten or being written from scratch entirely, but it’s finally ready and published.
Due to the huge number of stories that have been covered in this release, we will only focus on some key points here. More posts will follow soon with more details about the new projects and rewrites.
An overview of what has changed
All these stories have been implemented. Apart from that, three libraries were written from scratch, called Jinya Configuration, Jinya Database and Jinya Router. More about them will come in later posts. During the development process Jinya Releases was completely rewritten. The same goes for Jinya Fonts. Cosmo CSS got a proper makeover too, so stay tuned for the screenshots.
Anyway, let’s take a look at all stories handled in this release.
- TG-136 API documentation
- TG-189 Create multiple docker image
- TG-191 Add analytics integrated in Jinya
- TG-192 Allow configuration via designer and API
- TG-195 Two factor via TOTP
- TG-198 Option to migrate files to jinya-content
- TG-201 Allow to disable login email
- TG-202 Folders for files
- TG-204 Add pint
- TG-205 Rename pages
- TG-206 Redesign segment page editor
- TG-207 PHP 8.3 compatibility
- TG-209 Folder like structure for blog categories
- TG-210 Integrate Jinya Database and Jinya Router
- TG-211 Update form editor
- TG-212 Update menu editor
- TG-213 Update Cosmo CSS
- TG-214 Replace frontend api with proper api client
- TG-215 Files multi select
- TG-216 Redesign installer
- TG-217 IP address location
- TG-218 Redesign login
- TG-220 Rename namespace to Jinya
- TG-221 Integrate AlpineJS
- TG-222 Allow file upload from anywhere
- TG-223 Redesign blog area
- TG-240 Add cache page
- TG-241 Replace tiny with Jodit
- TG-242 Pre cache files
- TG-243 Central place for dexie
- TG-244 Handle external change in local changes
- TG-245 Allow auth with Authorization header
- TG-246 Convert files after upload
- TG-248 New Jinya Releases
- TG-249 Set required PHP to 8.3
Since many changes were technical in nature, this post won't cover them, we will focus instead on the user interface changes.
The stories we will cover are as follows:
- TG-191 Add analytics integrated in Jinya
- TG-192 Allow configuration via designer and API
- TG-195 Two factor via TOTP
- TG-201 Allow to disable login email
- TG-202 Folders for files
- TG-205 Rename pages
- TG-206 Redesign segment page editor
- TG-209 Folder like structure for blog categories
- TG-211 Update form editor
- TG-212 Update menu editor
- TG-215 Files multi select
- TG-216 Redesign installer
- TG-218 Redesign login
- TG-222 Allow file upload from anywhere
- TG-223 Redesign blog area
- TG-241 Replace tiny with Jodit
The stories will be grouped into the following sections:
- Analytics
- TG-191 Add analytics integrated in Jinya
- Editing
- TG-202 Folders for files
- TG-205 Rename pages
- TG-206 Redesign segment page editor
- TG-209 Folder like structure for blog categories
- TG-211 Update form editor
- TG-212 Update menu editor
- TG-215 Files multi select
- TG-222 Allow file upload from anywhere
- TG-223 Redesign blog area
- TG-241 Replace tiny with Jodit
- Design changes
- Configuration
- TG-192 Allow configuration via designer and API
- Security
Analytics
Let's start with the biggest new feature, and probably one of the only really new features relevant for you as an artist.
Prior to Jinya CMS 26, you had to employ a third-party service to collect site analytics for your site. This might have involved adding a cookie banner to your site and not getting any results if users use an AdBlocker. Apart from that, you would also need to leave the Jinya designer.
But what does the integrated Analytics actually track and what do you need to do to actually use it? Let's start with how you can start using it, you don't need to do anything. The tracking is done automatically by Jinya in real time, so you always have an accurate view on your website traffic. Most important, you get sparklines on every gallery, page, form and blog post, so you see how the traffic developed over the past month.
Now let’s take a look at the data the analytics provides. Currently, the analytics dashboard shows four time ranges for the metrics. The first tab shows you the visits of the current month, the second tab gives you the past quarter, the third one displays the past six months, and the final tab displays visitors from last year.
The data collected is basically all information you can get from the visit without JavaScript, which is surprisingly much. The only thing the analytics skip, even though it would be possible, is a detailed location of the visitor. The reason being that we don’t want you to force the inclusion of data deletion forms in your website. All data included are anonymous and don't allow any recognition of individual users or their devices. The IP address of the visitor is reduced to only a country and a city.
But enough talk, let's look at a few screenshots of the statistics page.
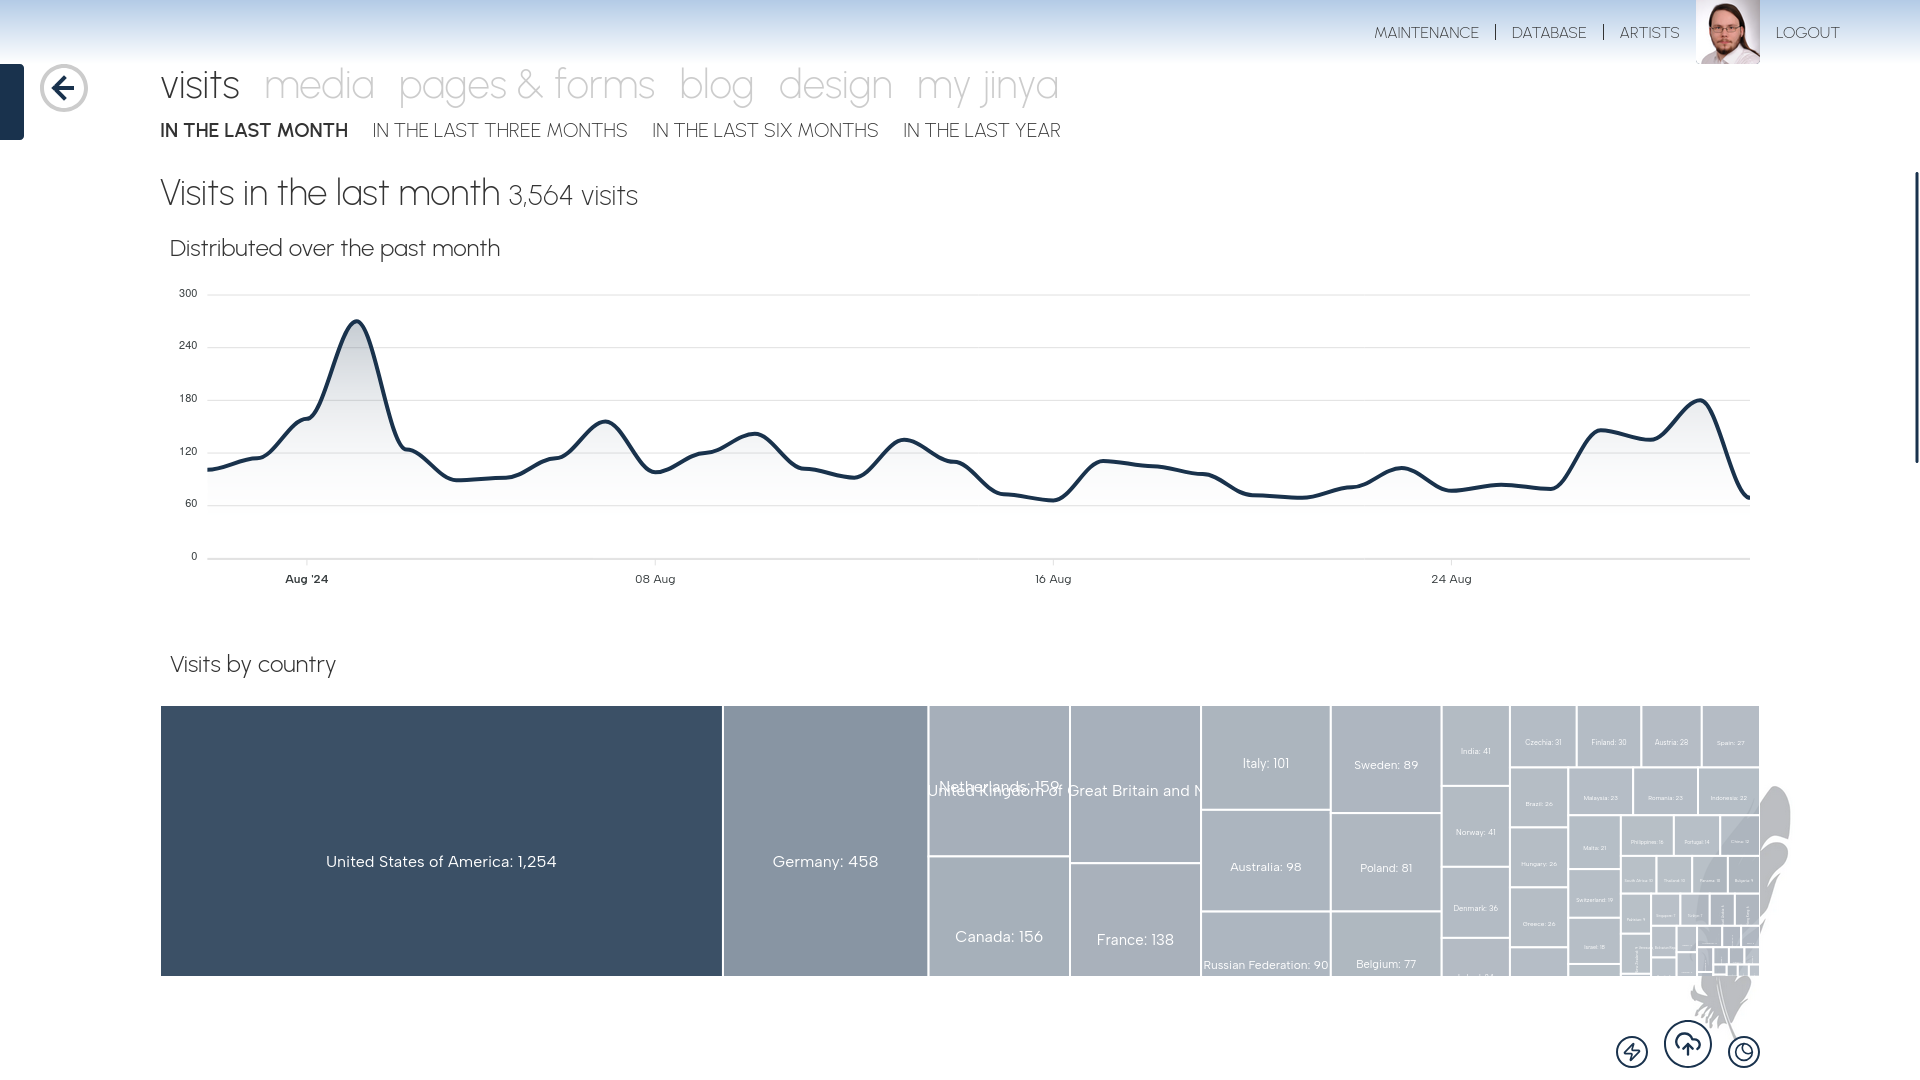
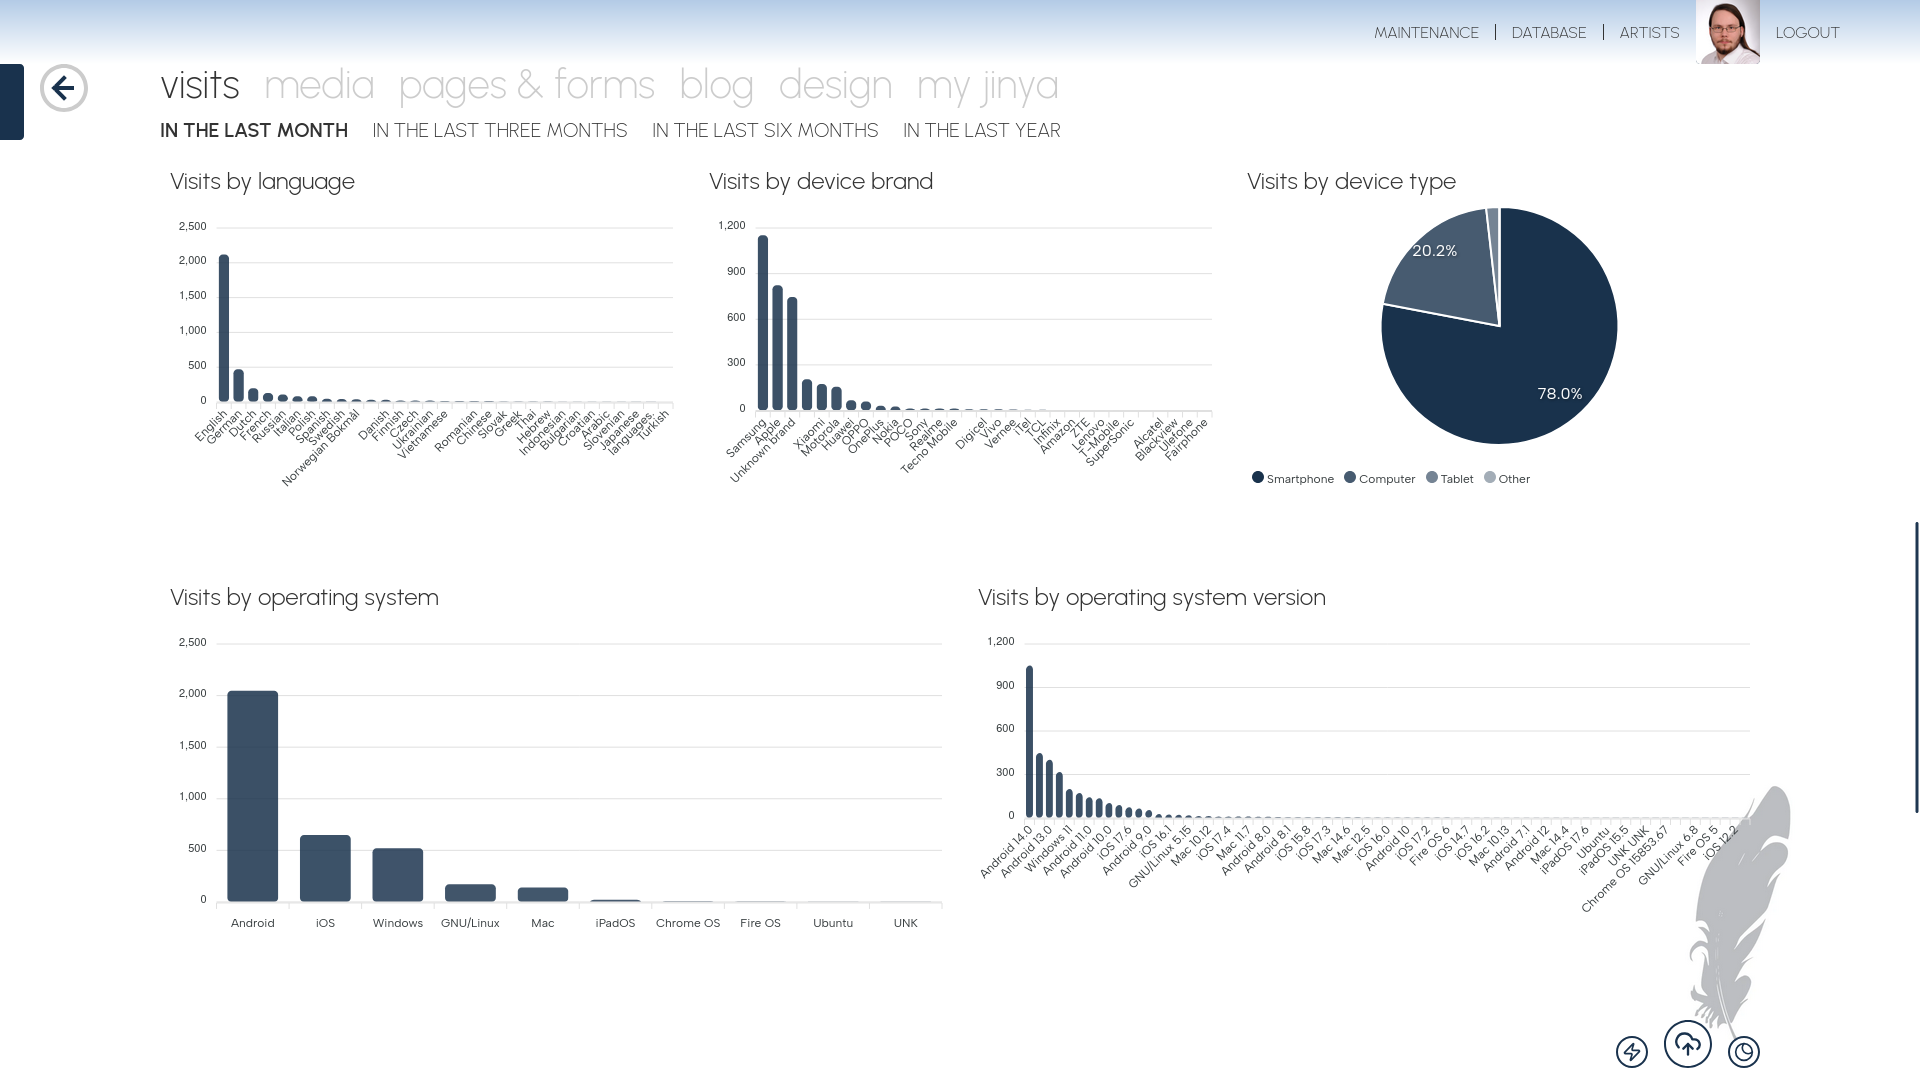
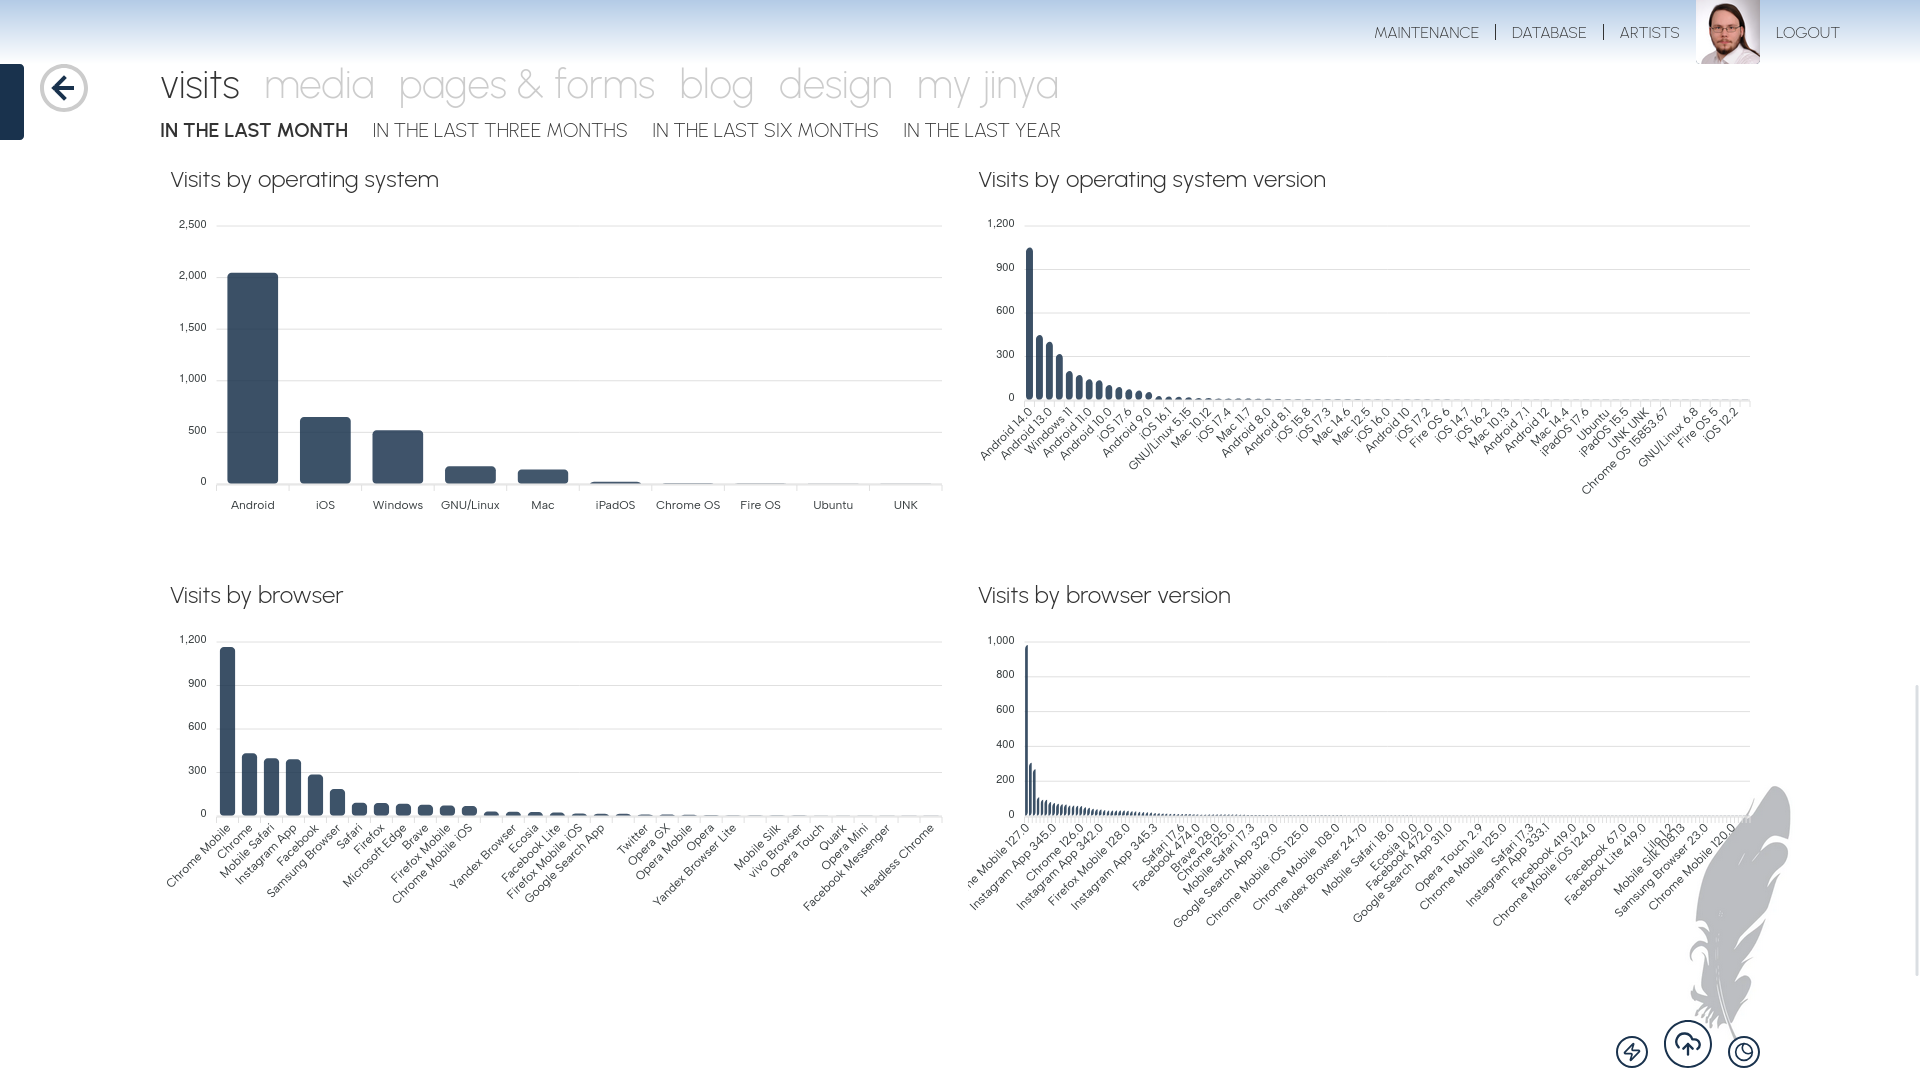
It is still possible to include an additional option for tracking your visitors, but with the new integrated analytics tool provided, you have a very privacy-friendly solution for visitor tracking. It might not be the most complete, but it gives a very nice overview.
Editing
The editing experience in Jinya CMS was quite good already, but we improved it nonetheless. One of the major improvements is that the changes are stored in your browser until you send them back to the server. This means you can reset your changes and even recover them if you accidentally close your browser. But there are also two major new features added.
The most important new feature is that the file manager now includes folders. This allows a better organization for large numbers of files which are used in multiple galleries, pages or blog posts. Apart from the updated file manager, the blog designer got rewritten completely and has a way better editing experience than before. This editing experience was also adapted to the segment pages. This brings us to one of the smaller changes, the pages were renamed. The old name “segment page” will be replaced with the more understandable name "modern page" and "simple pages", which provide only a simple text editor are now called "classic pages". The name change is based on the editing experience the artist has, the classic pages have a more classic feel while modern pages give a more modern style of editing, like used in WordPress and Ghost.
A big bummer appeared while updating all libraries used by Jinya CMS. Our editor for pages, blog posts and artist profiles changed its license. Now, that might sound trivial, but it would have required us to update our licenses as well or pay a metric ton of money just to keep using the editor we were already familiar with. We needed a solution, and finding that solution was way harder than expected. Most editors either use a fairly restrictive license or are paid by page view. Both options don’t work for us. The Jinya Project is a small independent project and consists of two developers and two artists who are the testers, so paying thousands in licensing fees every month/year is simply not an option. But after a lot of searching online, we found a solution. I won't go into details, but we replaced the old editor with a new one which even allowed us to integrate the design even better into Jinya CMS.
Another cool addition is the option to upload files from anywhere in the designer. You are no longer restricted to uploading the files in the media page. In the bottom bar is now a new button which allows you to upload new files where ever you are in the designer. The last feature that I want to mention here is that it is now possible to select multiple files at once and then delete or tag all of them at once.
Design changes
Let's continue with the design changes. The biggest design change is the update to Cosmo CSS, the update gives it a more modern look while still keeping its user experience similar if not even the same as before.
After updating Cosmo CSS, we decided on giving the login a new and more inviting design. This includes the installer as well, which is now a proper component and not just a fast-built feature that was necessary. It now features a proper design and gives a more pleasant experience for users when they start out with Jinya CMS.
Configuration
As of now, the only option to configure Jinya CMS was through a configuration file. In Jinya CMS 26 it is now possible to change most settings directly from within the designer. The only settings not changeable in this way are those related to the database connection.
Security
Last but not least, I want to talk about the changes in security. In the security context we made two major improvements. The first one being that you are now able to enable a second factor using an authenticator app like Google Authenticator or Authy. You can enable and disable this feature in the My Jinya section.
You can now also disable the emails you receive from Jinya CMS on successful logins and new saved devices. Like the two-factor setting, this is enabled in the My Jinya section.
Final thoughts
As you can see in the list at the beginning of my blog post, there were many things we worked on over the past year. This was a lot of work, and we hope you forgive us for taking so long. Apart from all the features discussed in detail above, we have changed lots more, but most other changes are under the hood and should not be noticed by you.
We hope you like the new version as much as we do. The next big features coming are an Android app and maybe a desktop application too, so stay tuned.